
DomuS3D® is protected by a hardware key (dongle) that can be connected to any USB port of the Server machine (or any other port available in the network, provided that you specify the correct key-path on all Clients you will install).
Alternatively, the program can be protected with a software key. Although this requires an active Internet connection, the software key gives you several additional advantages:
- You no longer need to always have the hardware key with you, as the license will be entered using a Username and Password
- You no longer risk losing, damaging, or having your hardware key stolen
- You can use the program on Virtual Machines
The hardware requirements for DomuS3D can be found here: Hardware Requirements
Prior to installing DomuS3D®, check that all Windows updates have been downloaded and installed, in order to avoid conflicts.
Prior to starting the installation, verify that the hard disk where you install the program has enough space. If you are upgrading from an older version, you need to have at least double the space occupied by the former version available.
We will now go through the Setup procedure step-by-step; we will look at the Server and Client installation in detail.
Insert the USB key and access its contents. If you received the installation files over the Internet (download links) you need to double click them in order to extract content. Save it locally in the same folder. you do not need to extract the .rar file, as the setup procedure will do it for you automatically.
We recommend that the path you choose for the installation is not too long, for example, D:\DomuS3DXXX, D: is the disk and XXX is the number of the version.
Once the download is completed, double click the file named "part 1"; the following window will appear. Click "Install".
Files will be automatically extracted, and you should now see the following window:
Install Server component
Click "DomuS3D SERVER Installation" button, in the middle of the window.
The setup procedure will now ask you to install any remaining system requirements:
Click the "Install" button
Click the "Next" button in order to proceed.
Select the destination folder where you will store the DomuS3D® Server files; when done, click "Next". We recommend installing the program on a disk with a large amount of space. The program cannot be installed on a USB drive.
Now you need to specify which port to use between Server and Clients. You can use the default port or, if this port is already in use, you can select another. Your IT administrator should give you a different port number if needed.
Click the "Next" button. If the specified port is already occupied by other services, the setup procedure will notify you with a message:
In such a case, change port "49352" to a different value (e.g. "49600") and confirm. Click "Next" again, and check if this port is available. If not, change it again. When the port numbers have been set, you should move to the next step:
Read the license agreement, click on the box to accept, then click "Next".
If an older DomuS3D® Server is installed on the computer, you will be asked to import the old database (products and projects) into the new one. We recommend doing this so that you will find the same content in the new version as you had in the former one. In such a case, this procedure may take a long time, depending on how many products and projects you need to copy. Always be sure that no user is working on DomuS3D® during this procedure.
Make sure "Import data" is selected and click the "Next" button.
The setup procedure has now collected all the necessary information and is ready to start: click the "Install" button in order to proceed.
Contact the Support Team should the setup procedure return any error.
Once you install the first Client, you can check if all products and projects have been imported correctly. If there were any errors, please do not remove "DomuS3D® Server" and/or DomuS3D® Client.
If the setup is successful, we suggest that you still keep the previous version of the program for a while. Proceed with backing up and uninstalling the previous DomuS3D® version only when you are sure that the latest version has been correctly installed and contains all the necessary data.
If, for some reason, you need to re-start the Import data procedure, please see the following article: https://support.domus3d.com/hc/en-gb/articles/360001423593
Install Client component
Prior to proceeding with the installation of the Client version, check if the computer where the Client will run can access the shared folder on the Server computer where data will be stored. You can check if access is granted by opening the windows folder and accessing the Server computer: check if a folder exists named "DomuS3D_CS_Data_XXX" (where XXX depends on the program version: 180 for version 2018) and if you can enter it without providing any username and password.
If the data folder on the server is accessible, copy the same folder you used for the Server installation onto the Client Computer: click on file "part 1" again.
Double click the "autorun.exe" application, and you should see the following window:
Click the "CLIENT Installation" button.
The setup procedure is very similar to the previous one.
Once you have defined the destination folder, the setup procedure will search for the Server you previously installed and will show you the following window:
The name of the server should already be filled in. It there is no name (or if the name is not correct) write it manually, without starting with "\\".
If the procedure cannot verify the Server/port you have specified, a message will appear.
This means that the Client will not be able to connect to the Server, hence you need to resolve this issue. Check if there is any firewall blocking you from connecting to the server, and also check that the TCP port is available.
If everything works correctly, click "Next"/"Install" in order to complete Client installation. Once installation is complete, restart your computer.
If you are upgrading form a previous version, once you start the Client for the first time the Program will automatically try to update the protection key. If, for any reason, this is not possible, you will be prompted with the following window:
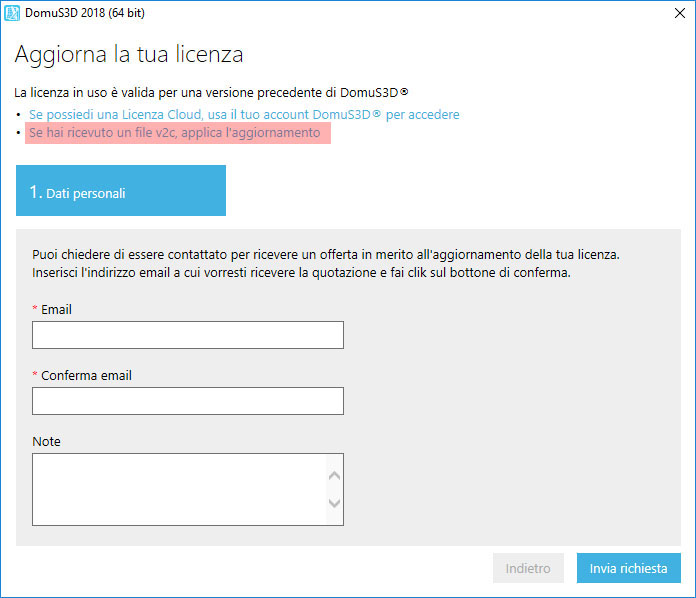
Contact Maticad in order to receive instructions on how to proceed with upgrading the protection key.
Maticad will send you a file (.v2c extension). You will be able to click the highlighted link, select "YES" in the following step, then select the .v2c file you received from Maticad on the disk.
This article is valid for DomuS3D® 2018 and later versions